Monday 23 March 2015

SLE 11 SP3 to SLE 12 - upgrade methods explained

SLE allows to update an existing system to the new version, for example, going from SLE 11 SP3 to SLE 12. No new installation is needed. Existing data, such as home and data directories and system configuration, is kept intact. You can update from a local CD or DVD drive or from a central network installation source.

Note: Before updating, copy existing configuration files to a separate medium (such as tape device, removable hard disk, etc.) to back up the data. This primarily applies to files stored in /etc as well as some of the directories and files in /var and /opt. You may also want to write the user data in /home (the HOME directories) to a backup medium.

Environment: SLES 11 SP3
Kernel sles11sp3: 3.0.76-0.11(before up-gradation)
kernel sles12sp0: 3.12.28-4 (after up-gradation)

To upgrade your system this way, you need to boot from an installation source, like you would do for a fresh installation. However, when the boot screen appears, you need to select Upgrade (instead of Installation). The installation source to boot from can be one of the following:
- Local installation medium -(like a DVD, or an ISO image on a USB mass storage device)
- Network installation source -You can either boot from the local medium (like a DVD, or an ISO image)and then select the respective network installation type, or boot via PXE.

Objective: 
- Upgrade using network installation source using CDROM.
- Upgrade using network installation source using PXE.
- Perform an automated migration.

If you want to start an upgrade from a network installation source, make sure that the following below requirements are met, and I would leave it to reader to configure accordingly as it was already explained in previous posts (pxe-installation-on-sles-11)

Network Installation Source - network installation source should be setup.
Network Connection and Network Services - Both the installation server and the target machine have a functioning network connection. The network must provide the following services: a name service, DHCP(optional, but needed for booting via PXE)

Upgrade using network installation source using CDROM:

- Insert DVD 1 of the SUSE Linux Enterprise 12 installation media and boot your machine. A Welcome screen is displayed, followed by the boot screen.
- Select the type of network installation source you want to use (FTP, HTTP, NFS, SMB, or SLP). Since I had configured using HTTP, I would select HTTP to serve installations.

              Fig 1
   
               Fig 2

Upgrade using network installation source using PXE:
- Adjust the setup of your DHCP server to provide the address information needed for booting via PXE.
- Set up a TFTP server to hold the boot image needed for booting via PXE.
- Prepare PXE Boot and Wake-on-LAN on the target machine.

              Fig 3

- Once you get your screen as (Fig 2)Proceed with the upgrade process, steps are self-explanatory.

Perform an automated migration:

Copy the installation Kernel linux and the file initrd from /boot/x86_64/loader/ of your first installation DVD to your system's /boot directory

#cp -vi DVDROOT/boot/x86_64/loader/linux /boot/linux.upgrade
#cp -vi DVDROOT/boot/x86_64/loader/initrd /boot/initrd.upgrade
where, DVDROOT denotes the path where your system mounts the DVD

Open the GRUB legacy configuration file /boot/grub/menu.lst and add another section. For other boot loaders, edit the respective configuration file(s). Adjust device names accordingly to your /boot partition.

title Linux Upgrade Kernel
kernel (hd0,0)/boot/linux.upgrade root=/dev/sda1 upgrade=1   
initrd (hd0,0)/boot/initrd.upgrade

Reboot your machine and select the newly added section from the boot menu (here: Linux Upgrade Kernel).
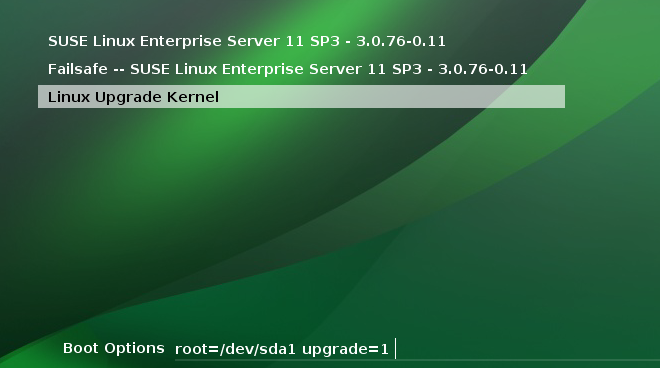
                 Fig 4

- Once you get your screen as (Fig 2)Proceed with the upgrade process, steps are self-explanatory.

- After the upgrade process was finished successfully, remove the installation Kernel and initrd files (/boot/linux.upgrade and /boot/initrd.upgrade). They are useless now and are not needed anymore.

Once the up-gradation is completed, system would be rebooted and booted with new kernel. 

     
                  Fig 5                                             Fig 6

Up-gradations completed successfully.

Friday 13 March 2015

Installation and Configuring FTPS - Redhat/CentOS

     
'vsftpd' is a very popular package for FTP, but poses a security threat because it transfers username,passwords etc in plain text, I would explain in this article as how FTP offers encryption with the help of SSL and TLS protocols.

FTP defines a client-server architecture that uses two ports in-order to establish connectivity between server and the client.
1. Port # 20 : data transfer
2. Port # 21 : autentication connnections.

as a security measure, we have two options that offer secure file transfer capabilities, which are SFTP and FTPS.
SFTP uses a SSH connection to run file transfers over a secure channel, while FTPS uses cryptographic protocols such as SSL( Secure Socket Layer) and TLS (Transport Layer Security).

I would elobrate SFTP protocol in order to setup a secure FTP server using SSL certificates.

Environment: CentOS 6.6/Redhat 6.6 (x86_64)
Packages : vsftpd-2.2.2-12.el6_5.1.i686 / openssl-1.0.1e-30.el6.i686

Install openssl and vsftpd based on your distros:

sudo apt-get install vsftpd openssl  -> Debian
yum install vsftpd openssl           -> Redhat
zypper install vsftpd openssl        -> SuSE

For, data encryption purpose we need to create a SSL certificate(rsa_cert_file)and RSA key file(rsa_private_key) which is used by 'vsftpd' in the configuration file (/etc/vsftpd/vsftpd.conf).

[root@centnode1]# openssl req -x509 -nodes -days 365 -newkey rsa:2048 -keyout /etc/vsftpd/vsftpd.pem -out /etc/vsftpd/vsftpd.pem
Generating a 2048 bit RSA private key
.+++
.............+++
writing new private key to '/etc/vsftpd/vsftpd.pem'
-----
You are about to be asked to enter information that will be incorporated
into your certificate request.
What you are about to enter is what is called a Distinguished Name or a DN.
There are quite a few fields but you can leave some blank
For some fields there will be a default value,
If you enter '.', the field will be left blank.
-----
Country Name (2 letter code) [XX]:IN
State or Province Name (full name) []:Karnataka
Locality Name (eg, city) [Default City]:Bangalore
Organization Name (eg, company) [Default Company Ltd]:testlabs
Organizational Unit Name (eg, section) []:OperatingSystems
Common Name (eg, your name or your server's hostname) []:centnode1
Email Address []:sunlnx@gmail.com
[root@centnode1]#

We need to instruct vsftpd to use that SSL certificate to carry encryption process for data and authentication:

[root@centnode1]# vi /etc/vsftpd/vsftpd.conf

#Turn on SSL
ssl_enable=YES
allow_anon_ssl=NO
force_local_data_ssl=YES
force_local_logins_ssl=YES

#Mention the certificate and key file location
rsa_cert_file=/etc/vsftpd/vsftpd.pem
rsa_private_key_file=/etc/vsftpd/vsftpd.pem

#Enable TLS as it is more secure than SSL
ssl_tlsv1=YES
ssl_sslv2=YES
ssl_sslv3=YES

#allow local users added to the system to use FTP
local_enable=YES

#Prevent anonymous logins
anonymous_anable=NO

#accept FTP write command
write_enable=YES

#chroot users
chroot_local_user=YES
[root@centnode1]#

start/restart your 'vsftpd' to take effect and make sure it start's during the boot time.

[root@centnode1]# service vsftpd start
[root@centnode1]# chkconfig vsftpd on

Now, your FTP server is ready and can add users who can access it. every user will get a separate home directory and with chroot jail activated users are forced to work within their home directories.

[root@centnode1 ~]# useradd ftpuser
[root@centnode1 ~]# passwd ftpuser

Test your SSL connection over 'vsftpd'

when you first try to connect using plain ftp, it must fail asking for encryption.

[root@centnode1 ~]# ftp 192.168.229.130
Connected to 192.168.229.130 (192.168.229.130).
220 (vsFTPd 2.2.2)
Name (192.168.229.130:root): ftpuser
530 Non-anonymous sessions must use encryption.  <<<=====================
Login failed.
ftp>

create few files in 'ftpuser' home directory and get them listed using 'curl' 

[root@centnode1 ~]# curl --ftp-ssl --insecure --user ftpuser:password ftp://ftpserver
-rw-rw-r--    1 500      500             0 Mar 13 06:15 ftptestfile
[root@centnode1 ~]#

ftp-ssl  : tells curl to use ftps
insecure : tells curl not to use any ssl certificate to authenticate and instead just connect.
user     : specifies the username and password

Now, the user 'ftpuser' will be able to use the FTPS services with any FTP clients that supports SSL/TLS such as filezilla. If you want to limit access to FTPS server, but allow people to use FTPS services at the same time, by changing their shell to /sbin/nologin.